Tutorial PS - Tag PerspectiveEffect
Copyright © Charlieonline.it 2002 - 2026Tutti i diritti riservati
Please read my TOU's ==> HERE
Copyright © Charlieonline.it 2002 - 2026
Tutti i diritti riservati
Tutorial written by ©charlieonline graphics
Any resemblance to any other tutorial is purely coincidental.
Please feel free to link to this tutorial,
and/or print it out for your own personal use,
BUT do not upload, share, or re-write or translate it without permission.
Besides you may not script it and sell the script.
You may not sell works from my Presets or Tutorials
All my works are for personal use only, and with no profit-websites
Anything made from my tutorials is for personal use,
and may not be used on commercial sites or blogs.
When displaying the results from my tutorials, a link to this site is required.
It goes without saying that my resources cannot be used for anything
pornographic, obscene, deflamatory, or in violation of the law.
Thank you!
This tutorial was written using PS Cs5
but may be done with other versions.
It would take a little basic knowledge to run it.
My 1 tutorials in PhotoShop
wooooooooooowwwww
I have to thank Dona & Kath
from Learning-Photoshop-Group
This Tutorial was never born without their teaching!
Supplies needed.....Here
My ch-Style-ps2.asl
Mist Tiger_CarlBrenders. png by Elya
................
Art by ©CarlBrenders
The image by CarlBrenders_GhostlyQuiet.....Here
...............
Brushes by Coby17 and Szuia
Flowers or Swirls or Leaves brushes HERE or HERE
71-floral_swirls_brushes_by_szuia.abr
Flowers_and_waves_by_Coby17.abr
Plugins: the PS default filters Texture
Preparation
Extract and place my ch-Style-ps2.asl to your Styles Folder
in Win xp pro is to:
C:\Documents and Settings\Windows User\AplicationData\ Adobe\Adobe Photoshop CS5\Presets\Styles
Open the image CarlBrenders_GhostlyQuiet.jpg and
Tiger_CarlBrenders.png in PS and minimizze it.
Set your Foreground color to white
and Background to #fef8d4
Let's begin!?!?!
1 - Open the image CarlBrenders_GhostlyQuiet
you have minimized
Image - Duplicate
and close the original
In the Layer Palette Right click on the layer
and select the option Layer from Background
Name it CarlBrenders Copy
Create a new layer by clicking the button
on the top of your Layer palette
Name it Perspective
Select the Rectangular Marquee Tool with this settings
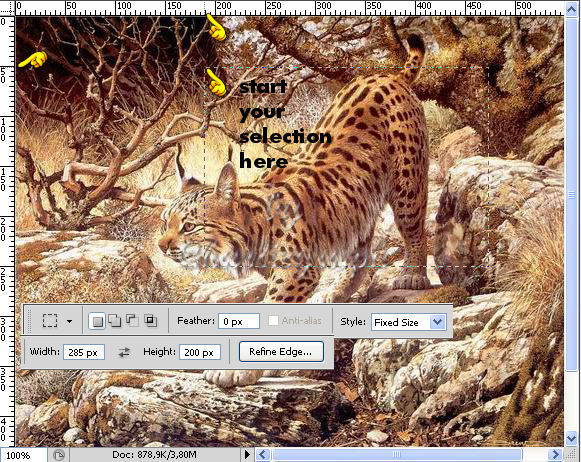
Click into your image
on the point between top 190 & side 50
to make your selection
Let go off the mouse button
Select your Paint Bucket Tool
make sure your Perspective layer is highlighted
fill the selection with the foreground color White
Keep Selected!
Select - Modify - Contract by 8 pixels
Hit the Delete key on your Keyboard
Select - Deselect
2 - Edit - Transform - Perspective
from the Photoshop Menu bar
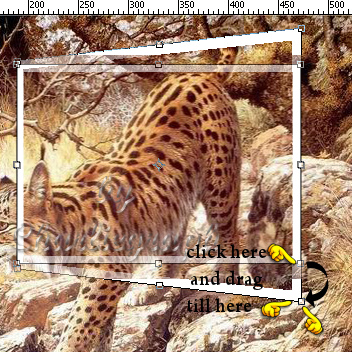
Click and drag the bottom-right handle and move it down,
until you get the result as shown below
Press the "Enter" button on the keyboard
to apply the adjustment
Edit - Transform - Distort
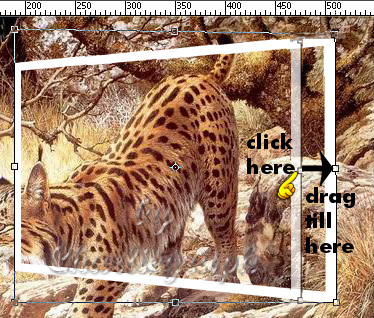
Click and drag the middle-right handle and move it out
just a little bit, until you get the result as shown below
Press the "Enter" button on the keyboard
Now if you like we can apply a Style to the Perspective Frame
If you like use mine, so.......
3 - Duplicate the Perspective Layer
leave the default name Perspective Layer Copy
Go to the Styles Palette and look for my ch-Style-ps2.asl
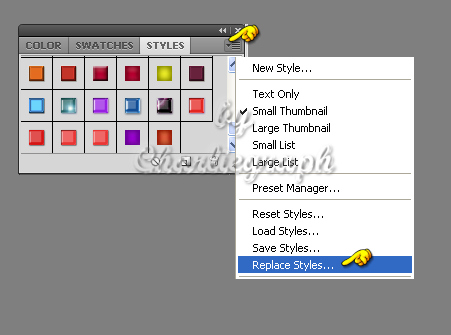
Make sure your Perspective Layer Copy is highlighted
and click on my ch-Style-ps2 in the Styles palette
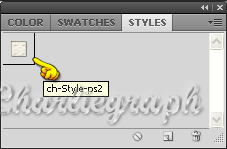
Layer - Smart Object - Convert to Smart Object
Layer - Rasterize
Hide the CarlBrenders Copy layer by clicking
the eye icon next to it in the Layer Palette
Layer - Merge Visible
Name it Perspective frame
Unhide the CarlBrenders Copy layer
4 - Select your Magic Wand Tool setting as below

and Click in a point inside the frame
Hilight CarlBrenders Copy layer
Select - Modify - Contract 3 px
Select - Invert
Hit the Delete key on your keyboard
Select - Deselect
Your image should be like this
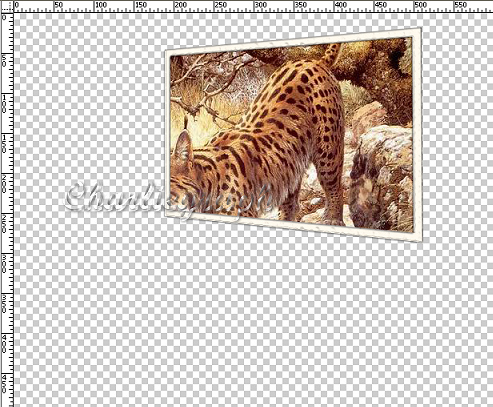
Layer - Merge Visible
5 - Open the Tiger_CarlBrenders. png
and with the Rectangular Marquee tool
draw a selection around it
Edit - Copy
Return on your working image
Edit - Paste
Place it by clicking on your Mover tool on the left
and with your cursor, move it in the right position,
just above the tiger
Remember: You can use your arrow keys on your keyboard
to nudge it one pixel at a time,
but you must have your Mover tool selected to do that.
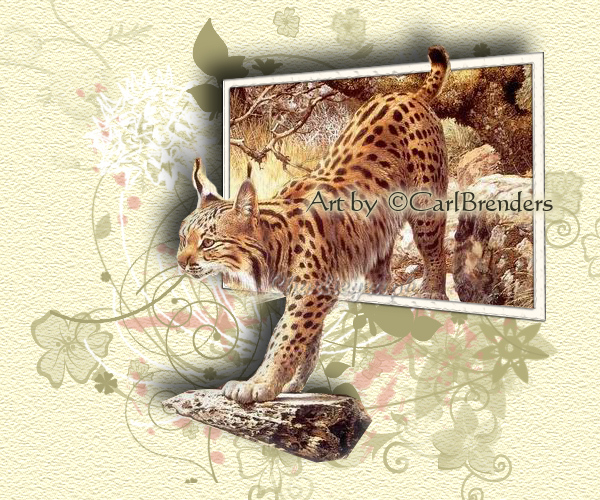
Use the finish work as example
This is what mine looks like now
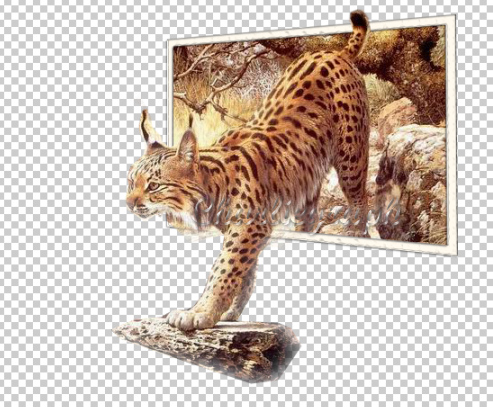
Put your work aside for a time!
6 - Create a new image setting like this:
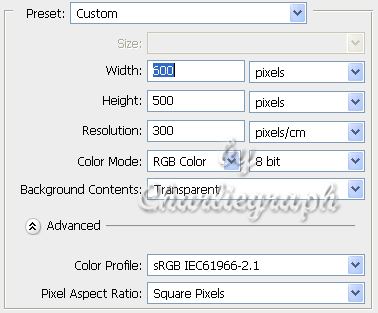
switch the Foreground/Background colors
and fill your image with the foreground #fef8d4
Go up to Filter tab menu, down to Texture,
then over to Texturizer
and set the window opens like this:
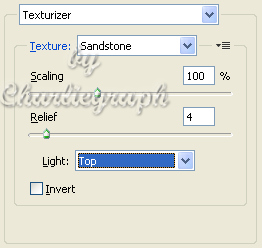
Click OK
Add a New Layer
7 - Change your foreground colour alternatively to #aaa474 and #e4b475
and others at your choice
Select the Brush Tool from your ToolBox

Reset the brushes and load the Basic Brushes if you have not in
Use the drop down arrow beside the brush tip preview window
to see the brush tip previews.
Use the arrow in the right hand corner
of the brush tip preview window, to show the sub menu.
Select: Load Brushes
Look for the Flowers or Swirls brushes you saved
and alternating your colors, brush your image something like this

Note: I thing it is better you add a new layer for every brush you draw out
so you can move them at your like
Layer - Merge Visible
Rename as Background
Return to your precedent work
8 - With the Rectangular Marquee tool
draw a selection around it
Edit - Copy
Return on your working image
Edit - Paste
and Place it as the finished image
Layer - Duplicate
Layer - Merge Down
Rename as Tiger
Now we go to add a little Drop Shadow
Make sure you have Tiger layer highlighted
9 - At the bottom of the Layer Palette click the fx button,
and from the flyout click on Drop Shadow.
Change your settings as in the picture below
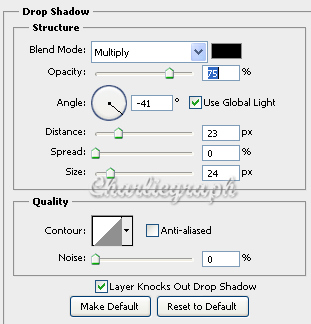
Click ok
Layer - Merge Visible
If you like add a little border
Add your watermark, and save as .jpg
Done!
I hope you enjoyed this tutorial.
If you have questions or need clarification
post a message to my Contacts.
Written at the end of August 2010
Return to Tutorials
My Tutorials are Registered at TWI

Per informazioni o suggerimenti
If you like write a message to my "Contatti"
Se hai dubbi o ti servono chiarimenti posta un messaggio nei "Contatti"
Copyright © Charlieonline.it 2002 - 2026
Tutti i diritti riservati
Torna all'inizio


Questo Sito è pubblicato sotto una Licenza (This website is licensed under a)
Creative Commons Attribuzione - Non commerciale - Non opere derivate 2.5 Italia License.